
Table des matières
In this guide, we will introduce you to various ways how to restore your WordPress website in an emergency with a previously created WordPress backup.
Table des matières
Restore a WordPress Backup with BackWPup Pro – NEW
BackWPup PRO helps you to restore the website backups you made with our backup plugin. To do this, you simply need a backup which was created with BackWPup. In case your website is destroyed completely and you don’t have access to your backend anymore, you can use the restore standalone app which you get as PRO user.
In our BackWPup restore documentation you can read how the restore with BackWPup works in detail.
Manually restore a WordPress Backup
Besides that, there are some tools to restore your WordPress website from a backup.
Nous vous expliquons ici commentrestaurer la base de données à l'aide de phpMyAdmin et d'Adminer, ainsi que commentrestaurer les fichiers à l'aide du client FTP FileZilla.
Please note: For this tutorial we use a complete WordPress backup created with BackWPup, as all needed files are contained. This is the preferred method for beginners.
Advanced users can also use partial backups. For example, not backing up plugins or themes as they are available in the WordPress.org repositories or stored locally on your computer. You can save some space with this method. This means it can be that you don’t have all the files we are mentioning here.
Contenu de l'archive de sauvegarde
Before you start, get the backup archive that you created with BackWPup. Unzip the
archive and take a look at the contents. You will see:
- the database of your WordPress as .sql file. The file may be zipped, depending on the settings of the backup job.
- the file SiteName.pluginlist.<Date>.txt – the list of all installed plugins. This is helpful if you don’t backup the plugin files, so you can easily add the plugins to your WordPress again and don’t forget any.
- the file SiteName.wordpress.<Date>.xml – the backup of the WordPress contents (blog posts, pages, products, etc.) in the XML format. Via the WordPress Importer you can restore the contents. In the admin area, this is located under Tools → Import.
- le fichier manifest.json – à l'avenir, ce fichier servira à la restauration automatique. Pour l'instant, vous pouvez ignorer ce fichier.
- the file backwpup_readme.txt – this file contains important information. You should read it before doing a restore.
- the files of your backed up WordPress installation – these need to be copied into the folder of your WordPress installation. See the part Restore the files with FileZilla. All other files mentioned above should not be copied to your server.
Restore the WordPress database from a backup
avec phpMyAdmin
phpMyAdmin is a web application which you can use to administrate MySQL databases via a browser. It is offered by many web hosts. You don’t need any MySQL skills to work with it, as the tool has a WYSIWYG interface. If you want to restore a database, follow these steps:
- Connectez-vous à phpMyAdmin.
- In the sidebar you can see all current databases. Choose the one you wish to restore. You can find the name of the database of your WordPress in the wp-config.php file, which is located in the main directory of WordPress. Search for the line
define('DB_NAME', 'your_database_name_here'); - Si certaines tables de la base de données figurent également dans la sauvegarde de la base de données, elles seront écrasées.
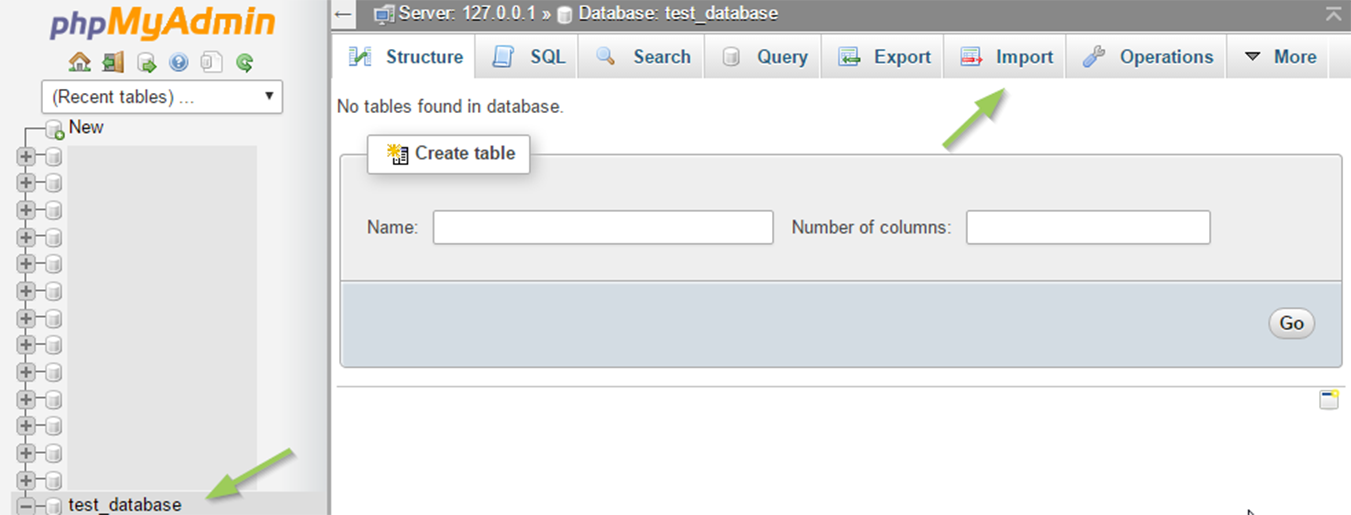
Connectez-vous à phpMyAdmin - Aller à Importer.
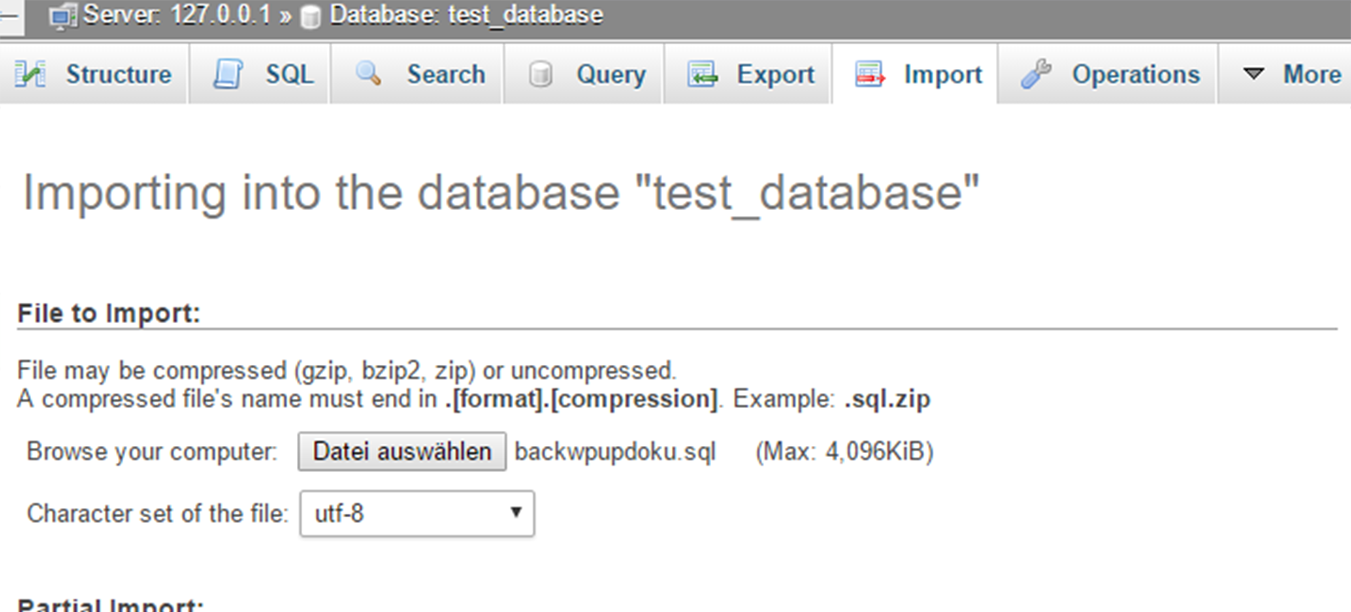
Cliquez sur « Importer ». - Select the database .sql file of the BackWPup backup from your computer. It may be a zipped file if it is not a .sql file. phpMyAdmin should automatically set the encoding and database format settings (see screenshot above). The format should match the ending of the database file, it should be SQL. You can check the encoding by opening the unzipped database file in a text editor. Find the line
/*!40101 SET NAMES ... */; - Cliquez sur le bouton OK et attendez que le message indiquant que l'importation s'est déroulée avec succès s'affiche.
Certains hébergeurs limitent la taille des bases de données pouvant être importées. Si vous essayez d'importer un fichier plus volumineux, un message d'erreur s'affichera. Veuillez contacter votre hébergeur ou essayer d'importer la base de données à l'aide du plugin Adminer, dont l'utilisation est décrite dans la section suivante.
avec Adminer
Adminer is similar to phpMyAdmin, it is a free tool you can download here. Upload it to the main folder of your WordPress installation. Adminer comes with just one php file, feel free to rename it to adminer.php for easier use.
- Ouvrez le fichier Adminer téléchargé, par exemple yourdomain.com/adminer.php in your browser. You’ll see a form where you need to fill in the database credentials. You can find these in the wp-config.php file of your WordPress or you can get them from your host.
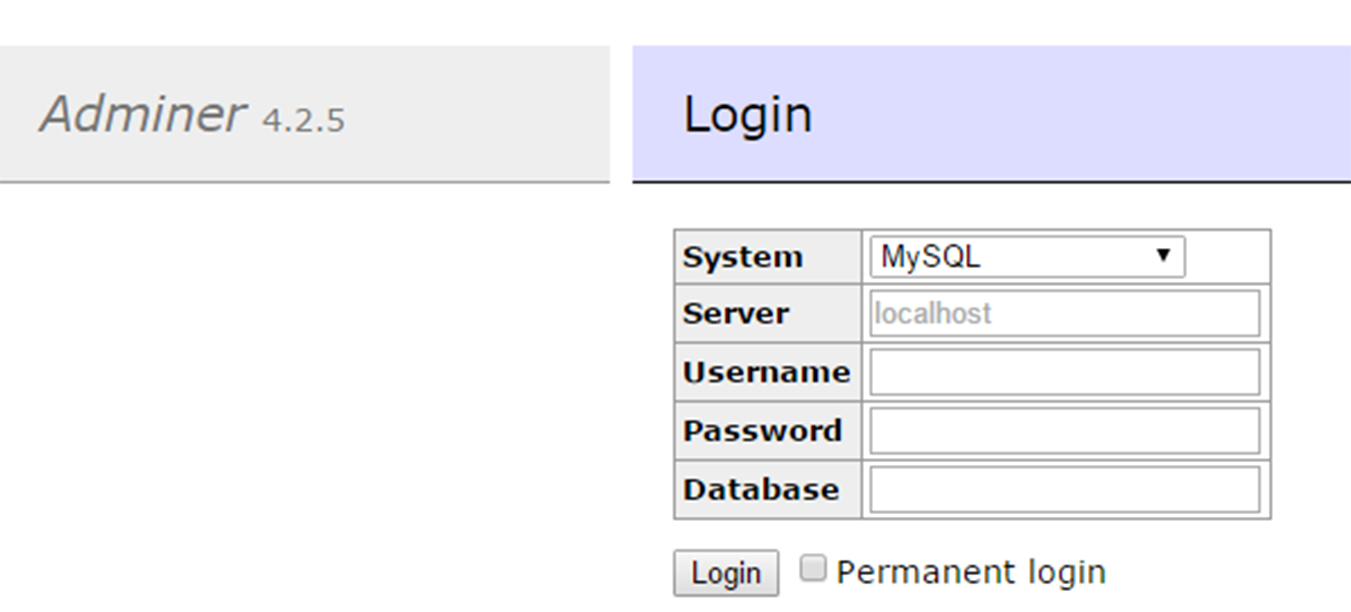
- Connectez-vous à l'aide de vos identifiants. Vous verrez alors s'afficher un écran similaire à celui de phpMyAdmin. Le fonctionnement est également similaire à celui de phpMyAdmin.
- Si certaines tables de la base de données figurent également dans le fichier de sauvegarde de la base de données, elles seront écrasées lors de l'importation.
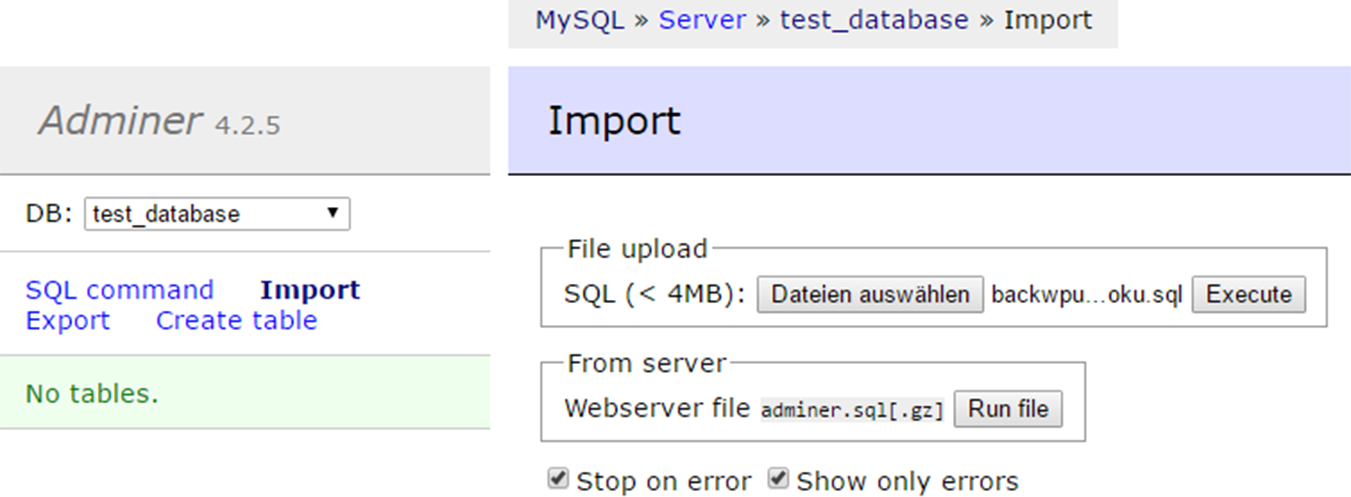
- Aller à Importer.
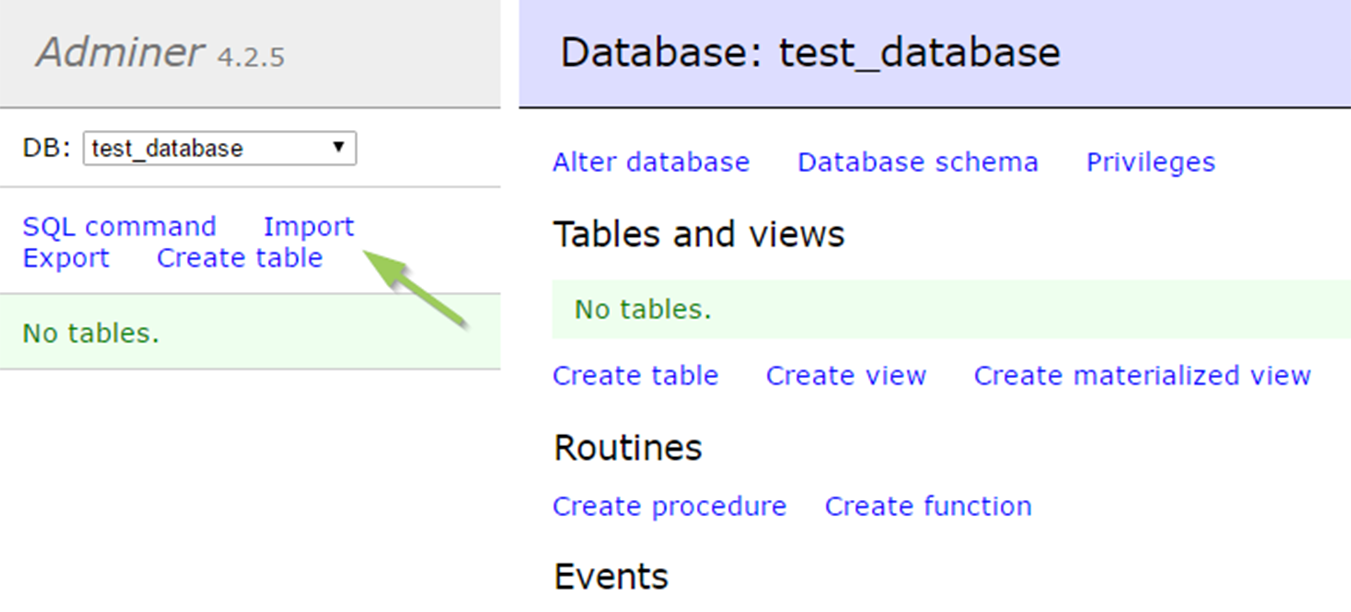
Accéder à l'importation dans Adminer - Select the database .sql file of the BackWPup backup from your computer. It may be a zipped file if it is not a .sql file. Once you selected the file, click on Exécuter. Instead of uploading the file via Adminer, you can upload it via FTP in the same folder of the adminer.php file. Rename the database backup file to adminer.sql.gz. En cliquant sur Exécuter le fichier L'importation de ce fichier est lancée.
Exécuter le fichier d'importation - Attendez de recevoir le message indiquant que l'importation s'est déroulée avec succès.
If your host does not allow the use of Adminer, you can give the plugin Adminer for WordPress a try. You can install it via the WordPress admin area and access it via the menü Ari Adminer.
Restore the WordPress files with FileZilla from a backup
Please note: For restoring the WordPress files with FileZilla, it is not relevant where you have saved your backup to. It can be Amazon, Google Drive, on a FTP server or any other destination: get the backup archive from there and unzip it to get the WordPress files (see section Contents of the backup archive) before you continue with the tutorial.
Restoring the WordPress files is simply copying the files from your backup to the folder of your WordPress installation via a FTP client like FileZilla. Follow these steps:
- Installez le client FTP FileZilla sur votre ordinateur si vous ne disposez pas encore de ce programme. Vous pouvez le télécharger ici. Il n'est pas nécessaire de télécharger FileZilla Server, seul le client suffit.
- Procurez-vous vos identifiants d'accès FTP. Si vous ne les connaissez pas, veuillez contacter votre hébergeur.
- Dans FileZilla, allez dans Fichier → Gestionnaire de sites, ajoutez un nouveau site et saisissez vos identifiants.
- Pour établir une connexion avec votre serveur web, cliquez sur « Se connecter ».
- Une fois la connexion établie, vous pouvez voir les fichiers de votre ordinateur à gauche et ceux de votre serveur web à droite.
- On the left side, navigate to the folder of your BackWPup backup. On the right side, navigate to the folder of your WordPress installation.
- Sélectionnez tous les fichiers que vous souhaitez télécharger dans la liste de gauche.
Please note: Only upload the WordPress files, NOT: the database, the file SiteName.pluginlist.<Date>.txt, the file SiteName.wordpress.<Date>.xml, the file manifest.json and the file backwpup_readme.txt.
- En cliquant avec le bouton droit de la souris sur la sélection, un menu contextuel s'ouvre, dans lequel vous pouvez lancer le téléchargement. Cela peut prendre quelques minutes, selon la taille des fichiers. Vous pouvez suivre la progression et voir les éventuelles erreurs dans la partie inférieure de la fenêtre FileZilla.
Please note: Files, which are not backed up by BackWPup (depending on your settings), need to be uploaded additionally. Missing plugins and themes can be re-added via the WordPress backend afterwards. If you chose the option for excluding thumbnails in backups, you need to regenerate them again. For this, you can use the plugin Regenerate Thumbnails.
Dernières étapes après la restauration
Une fois l'importation de la base de données et le téléchargement de vos fichiers terminés, suivez ces dernières étapes pour vous assurer que votre site fonctionne correctement :
-
Vérifiez votre site : ouvrez votre site web dans un navigateur pour vous assurer que tout se charge correctement.
-
Permalinks Update: Go to your WordPress admin area under Settings → Permalinks and simply click Save Changes. This flushes the rewrite rules and ensures your internal links work correctly.
-
Cache Clearing: If you use any caching plugins (like WP Rocket or W3 Total Cache), clear all caches to ensure the restored version of your site is served to visitors.
-
Nettoyage de sécurité : Si vous avez utilisé le Adminer méthode, n'oubliez pas de supprimer le
adminer.phpfichier depuis votre serveur via FTP pour des raisons de sécurité.
