
Indice
In this guide, we will introduce you to various ways how to restore your WordPress website in an emergency with a previously created WordPress backup.
Indice
Restore a WordPress Backup with BackWPup Pro – NEW
BackWPup PRO helps you to restore the website backups you made with our backup plugin. To do this, you simply need a backup which was created with BackWPup. In case your website is destroyed completely and you don’t have access to your backend anymore, you can use the restore standalone app which you get as PRO user.
In our BackWPup restore documentation you can read how the restore with BackWPup works in detail.
Manually restore a WordPress Backup
Besides that, there are some tools to restore your WordPress website from a backup.
Qui spieghiamo comeripristinare il database con phpMyAdmin e Adminer e comeripristinare i file con il programma FTP FileZilla.
Please note: For this tutorial we use a complete WordPress backup created with BackWPup, as all needed files are contained. This is the preferred method for beginners.
Advanced users can also use partial backups. For example, not backing up plugins or themes as they are available in the WordPress.org repositories or stored locally on your computer. You can save some space with this method. This means it can be that you don’t have all the files we are mentioning here.
Il contenuto dell'archivio di backup
Before you start, get the backup archive that you created with BackWPup. Unzip the
archive and take a look at the contents. You will see:
- the database of your WordPress as .sql file. The file may be zipped, depending on the settings of the backup job.
- the file SiteName.pluginlist.<Date>.txt – the list of all installed plugins. This is helpful if you don’t backup the plugin files, so you can easily add the plugins to your WordPress again and don’t forget any.
- the file SiteName.wordpress.<Date>.xml – the backup of the WordPress contents (blog posts, pages, products, etc.) in the XML format. Via the WordPress Importer you can restore the contents. In the admin area, this is located under Tools → Import.
- il file manifest.json – in futuro, questo file verrà utilizzato per il ripristino automatico. Per ora puoi ignorarlo.
- the file backwpup_readme.txt – this file contains important information. You should read it before doing a restore.
- the files of your backed up WordPress installation – these need to be copied into the folder of your WordPress installation. See the part Restore the files with FileZilla. All other files mentioned above should not be copied to your server.
Restore the WordPress database from a backup
con phpMyAdmin
phpMyAdmin is a web application which you can use to administrate MySQL databases via a browser. It is offered by many web hosts. You don’t need any MySQL skills to work with it, as the tool has a WYSIWYG interface. If you want to restore a database, follow these steps:
- Accedi a phpMyAdmin.
- In the sidebar you can see all current databases. Choose the one you wish to restore. You can find the name of the database of your WordPress in the wp-config.php file, which is located in the main directory of WordPress. Search for the line
define('DB_NAME', 'your_database_name_here'); - Se nel database sono presenti tabelle che figurano anche nel backup del database, queste verranno sovrascritte.
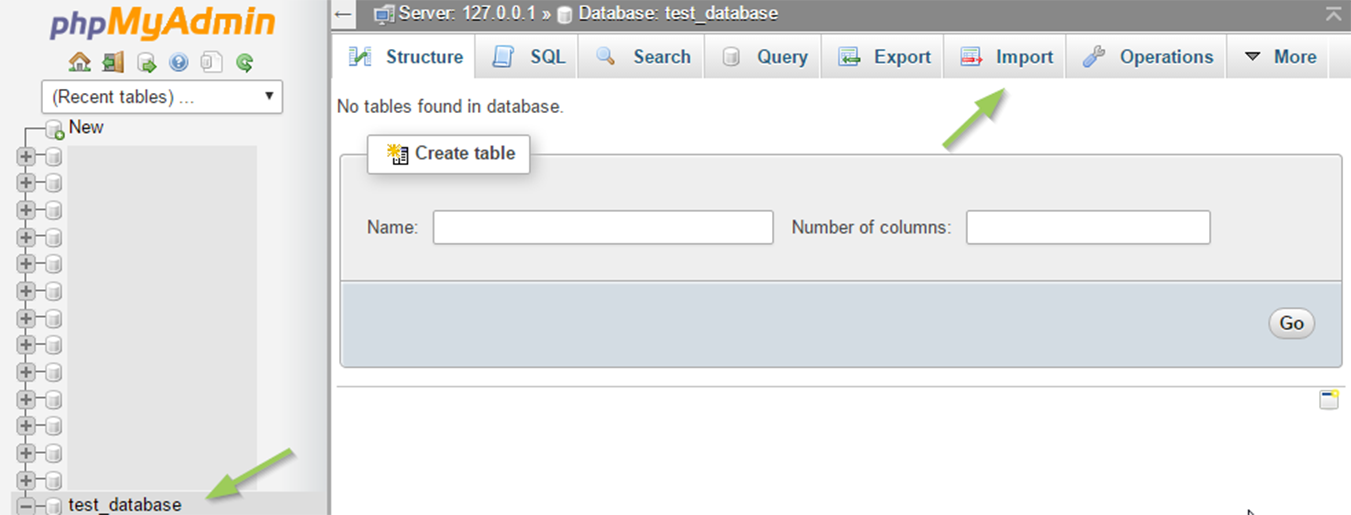
Accedi a phpMyAdmin - Vai a Importa.
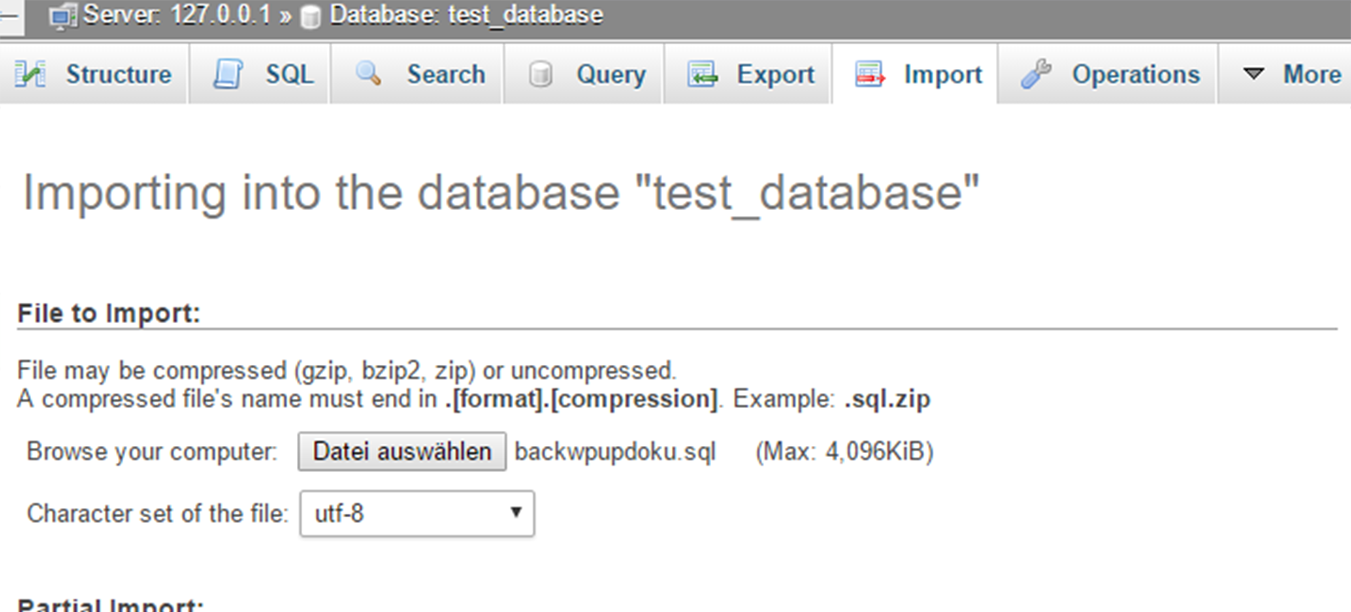
Vai su Importa. - Select the database .sql file of the BackWPup backup from your computer. It may be a zipped file if it is not a .sql file. phpMyAdmin should automatically set the encoding and database format settings (see screenshot above). The format should match the ending of the database file, it should be SQL. You can check the encoding by opening the unzipped database file in a text editor. Find the line
/*!40101 SET NAMES ... */; - Fai clic sul pulsante OK e attendi fino a quando non viene visualizzato il messaggio che conferma che l'importazione è andata a buon fine.
Alcuni provider consentono di importare solo database di dimensioni non superiori a un determinato limite. Se provi a importare un file più grande, riceverai un messaggio di errore. Contatta il tuo provider di hosting oppure prova a importare il database utilizzando il plugin Adminer, descritto nella sezione seguente.
con Adminer
Adminer is similar to phpMyAdmin, it is a free tool you can download here. Upload it to the main folder of your WordPress installation. Adminer comes with just one php file, feel free to rename it to adminer.php for easier use.
- Apri il file Adminer caricato, ad esempio yourdomain.com/adminer.php in your browser. You’ll see a form where you need to fill in the database credentials. You can find these in the wp-config.php file of your WordPress or you can get them from your host.
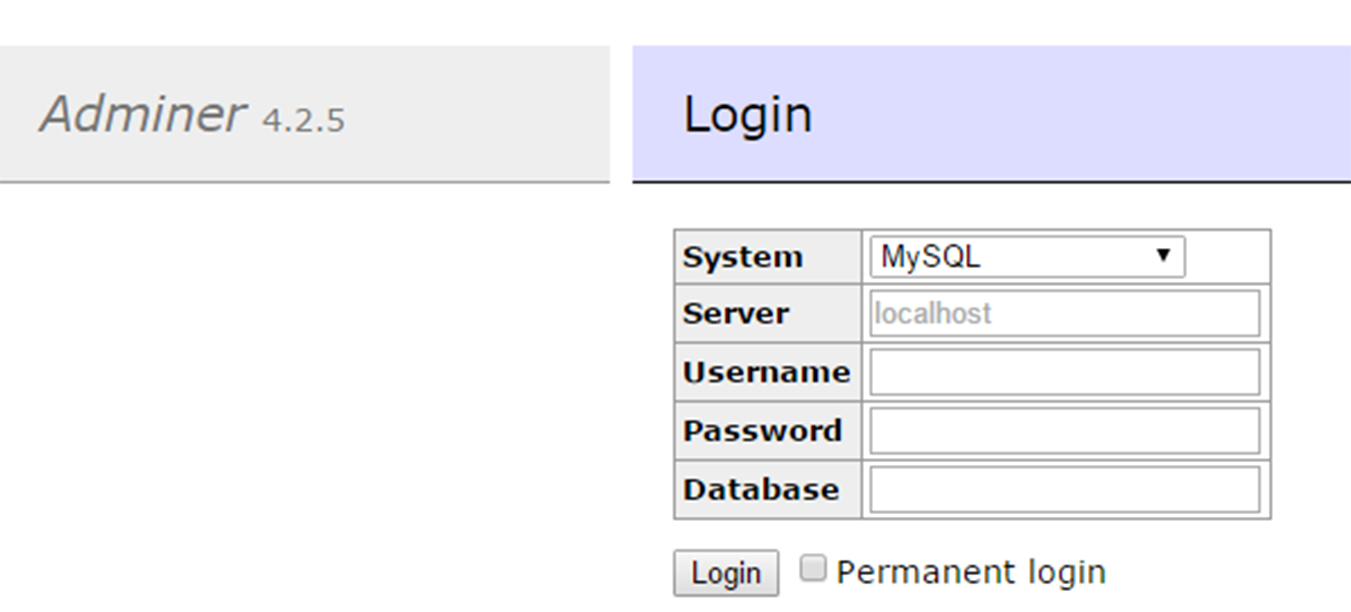
- Accedi utilizzando le credenziali. Verrà visualizzata una schermata simile a quella di phpMyAdmin. Anche il funzionamento è simile a quello di phpMyAdmin.
- Se nel database sono presenti tabelle che figurano anche nel file di backup del database, queste verranno sovrascritte durante l'importazione.
- Vai a Importa.
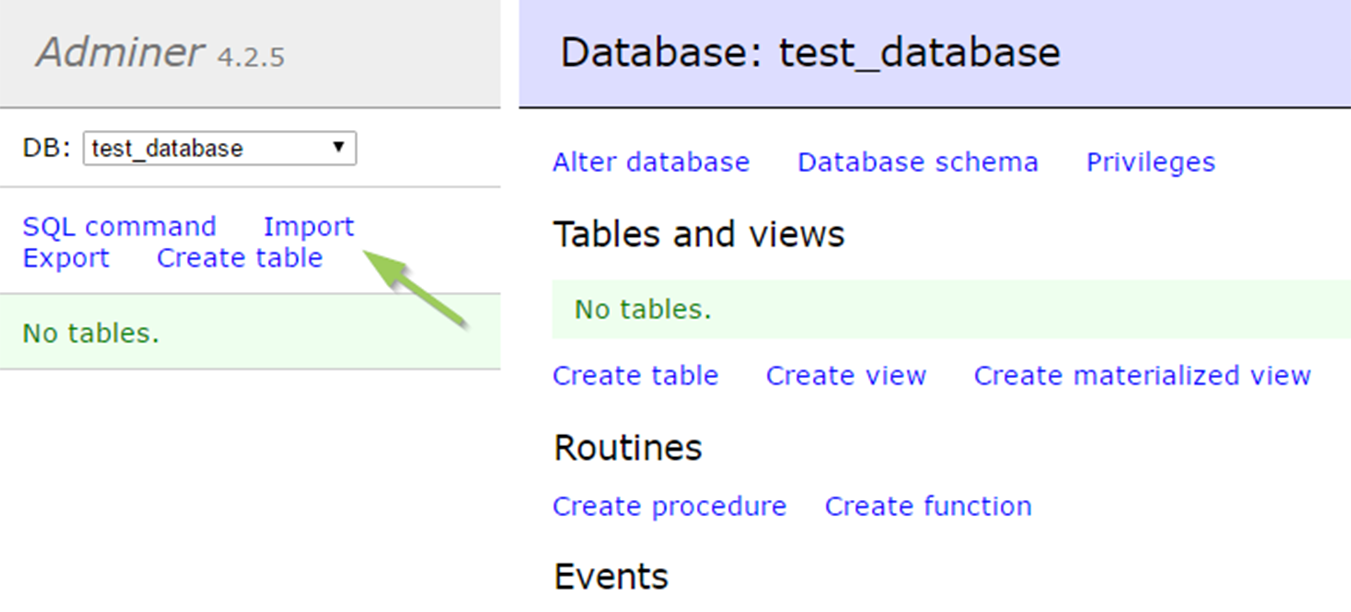
Vai a Importa Adminer - Select the database .sql file of the BackWPup backup from your computer. It may be a zipped file if it is not a .sql file. Once you selected the file, click on Esegui. Instead of uploading the file via Adminer, you can upload it via FTP in the same folder of the adminer.php file. Rename the database backup file to adminer.sql.gz. Con un clic su Esegui file L'importazione di questo file è stata avviata.
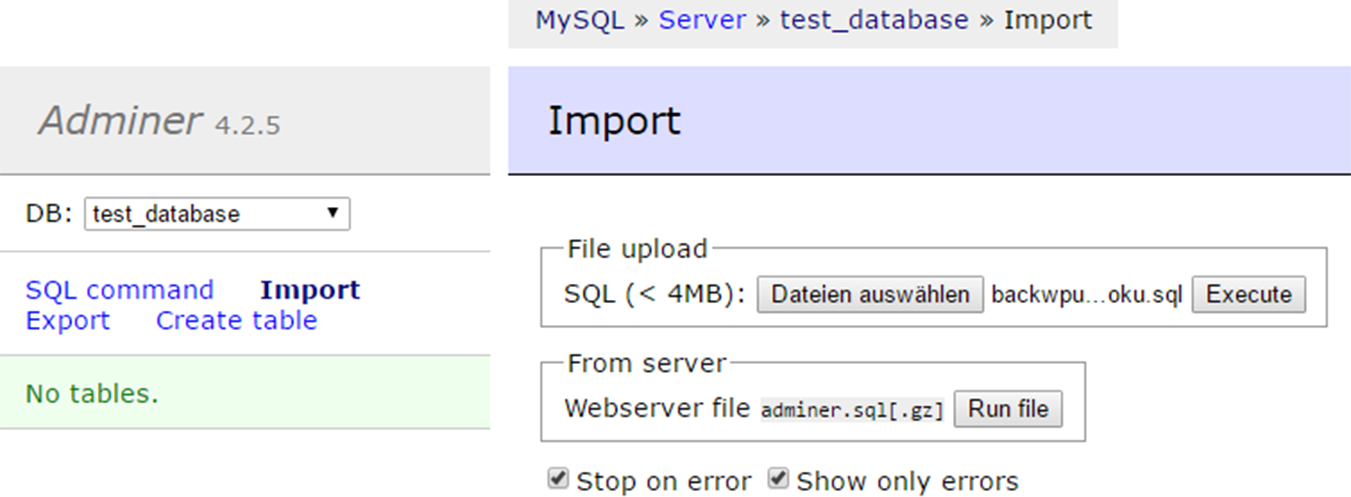
Esegui il file di importazione - Attendi fino a quando non riceverai il messaggio che l'importazione è andata a buon fine.
If your host does not allow the use of Adminer, you can give the plugin Adminer for WordPress a try. You can install it via the WordPress admin area and access it via the menü Ari Adminer.
Restore the WordPress files with FileZilla from a backup
Please note: For restoring the WordPress files with FileZilla, it is not relevant where you have saved your backup to. It can be Amazon, Google Drive, on a FTP server or any other destination: get the backup archive from there and unzip it to get the WordPress files (see section Contents of the backup archive) before you continue with the tutorial.
Restoring the WordPress files is simply copying the files from your backup to the folder of your WordPress installation via a FTP client like FileZilla. Follow these steps:
- Se non disponi di un programma di questo tipo, installa il client FTP FileZilla sul tuo computer. Puoi scaricare il programma qui. Non è necessario scaricare FileZilla Server, ma solo il client.
- Procurati le credenziali per l'accesso FTP. Se non le conosci, contatta il tuo provider di hosting.
- In FileZilla, vai su File → Gestione siti, aggiungi un nuovo sito e inserisci le tue credenziali.
- Per aprire una connessione al tuo server web, clicca su «Connetti».
- Una volta stabilita la connessione, vedrai i file presenti sul tuo computer sulla sinistra e quelli presenti sul tuo server web sulla destra.
- On the left side, navigate to the folder of your BackWPup backup. On the right side, navigate to the folder of your WordPress installation.
- Seleziona tutti i file sul lato sinistro che desideri caricare.
Please note: Only upload the WordPress files, NOT: the database, the file SiteName.pluginlist.<Date>.txt, the file SiteName.wordpress.<Date>.xml, the file manifest.json and the file backwpup_readme.txt.
- Cliccando con il tasto destro del mouse sulla selezione si apre un menu contestuale dal quale è possibile avviare il caricamento. L'operazione può richiedere alcuni minuti, a seconda delle dimensioni dei file. È possibile visualizzare lo stato di avanzamento e gli eventuali errori nella parte inferiore della finestra di FileZilla.
Please note: Files, which are not backed up by BackWPup (depending on your settings), need to be uploaded additionally. Missing plugins and themes can be re-added via the WordPress backend afterwards. If you chose the option for excluding thumbnails in backups, you need to regenerate them again. For this, you can use the plugin Regenerate Thumbnails.
Operazioni finali dopo il ripristino
Una volta completata l'importazione del database e il caricamento dei file, segui questi passaggi finali per assicurarti che il tuo sito funzioni correttamente:
-
Controlla il tuo sito: apri il tuo sito web in un browser per assicurarti che tutto si carichi correttamente.
-
Permalinks Update: Go to your WordPress admin area under Settings → Permalinks and simply click Save Changes. This flushes the rewrite rules and ensures your internal links work correctly.
-
Cache Clearing: If you use any caching plugins (like WP Rocket or W3 Total Cache), clear all caches to ensure the restored version of your site is served to visitors.
-
Pulizia di sicurezza: Se hai utilizzato il Adminer metodo, non dimenticare di eliminare il
adminer.phpcaricare il file dal tuo server tramite FTP per motivi di sicurezza.
